Overlocker Why Oh Why!

Over the past 24 hours me and my overlocker have not been happy.

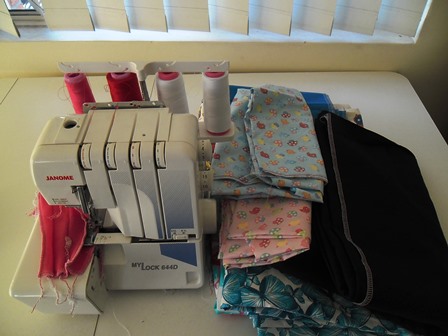
Let me set the picture.. Yesterday I came home from work early, it was a coolish December day which is unusual for this time of year in Sydney so I thought perfect I can get some sewing done. I pulled out my overlocker which was working perfect last weekend, changed the thread colours the way I always do by tying on the new colours and letting it run through my machine until it came to the needles which I thread manually. Everything looked ok I ran a test piece through and the thread on my left needle broke.

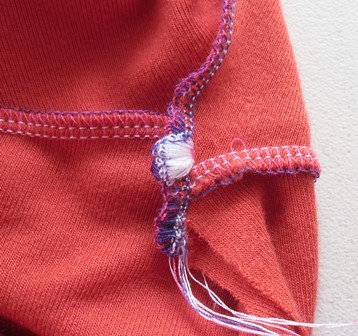
I rethreaded the eye of the needle again and the same thing happened again and again. It would run a couple of stitches then break again so I would replace the thread through the eye. I did this I don’t know how many times. I thought maybe it might be the needle itself so luckily the other week I had brought more overlocker needles and replaced the needle but the same issue was occurring. I cleaned out my machine (dust bunny city) thinking that might be the issue. I even turned the machine off and left it for a bit to see if that would help… Sadly not. At one stage the thread would hold in the eye but not catch the loops as shown in the above photo which I posted on both Instagram and Facebook asking for help.

A lot of lovely people suggested rethreading it and checking that is was threaded properly. Today was going to be my nice day at home sewing so I went back to my overlocker and tried again rethreading. I got it working for one item and I thought great problem fixed… When I tried the second item again the same issues occurred.

I manually threaded the needle from scratch checking that it was in the tension discs going over the different levers. I even changed back to white threading thinking maybe it doesn’t like the black thread today. I haven’t lost my temper at this point and I am not on the verge of tears but I am as frustrated as hell as to why it isn’t working…. I did Google new overlocker machines but I am not going to be that crazy to go buy a new one (the new air threader ones do look fancy) I have looked on YouTube for ways to fix it but its all the things I have already done. The only thing I haven’t tried is to cut all the threads and manually thread it instead of just tying on the new threads. It is just the left needle that is playing up. Except for the time I bent a needle in this machine I have never really had issues with it…. Maybe it is time for a service but of course its Christmas/New Year so no places will be available to do it.

I have one more item to make from A Beginner’s Guide To Sewing With Knitted Fabric and I just want to finish it by the end of this month. Unfortunately the fabric is a French terry so it really needs to have finished seams. I am starting to get upset that I won’t get it finished this year but it isn’t from lack of trying. I do have the option of using an overcasting/overlocking stitch on my regular sewing machine to finish my seams but that will be a lot slower to do and won’t be as neat as the overlocker would be. Stubborn me wants to get my overlocker figured out and not let it beat me. If in my day job I can figure out why computer reports aren’t picking up the correct information surely I can figure out why my overlocker isn’t working…

Cassiy

Roewood Skirt – First Attempt

Over the Easter long weekend I made my first skirt from A Beginner’s Guide To Making Skirts. The Roewood Jersey Pencil Skirt is the first skirt in the book and I think it is a good one to start with. The fabric I used was the fishscale remnant piece I picked up on my fabric crawl last month from the Remnant Warehouse. I made the plain version of the skirt.

Fit wise I used the 47″ version however I’ll admit I added an extra ½” around each pattern piece using my seam allowance guide. I didn’t want the fit to be too snug and I wasn’t sure how much stretch my fabric would give once sewn up as I had never worked with that fabric before so really it was more like the 49″ that I made. Assembly wise I kept my seam allowance fairly narrow and did the all the seams on the overlocker.

I am happy with the size that I did. Yes I have a tummy (love my hot chips) Side on you can see it a little I normally wear longer tops anyway but ever if I didn’t it doesn’t look bad. I like the length of it. I have worn this to work and it did pass the windy day test. I didn’t have to walk down the street holding my skirt which I have had to do with store brought pencil skirts.

For the waistband I used the largest pattern size. Even though I am hourglass shape (waist is smaller than hips and bust) I didn’t fall within the waist measurements from the pattern size. Once the waistband was attached to the skirt I realised I could have gotten away without even inserting elastic into the casing as the fabric was very compressing and fitted almost like a narrow yoga waistband but as I would be wearing this to work and not wanting to risk wardrobe malfunctions over time I added the elastic.

Originally I used a narrow elastic but it just felt wrong once I tried it on. It didn’t sit nice within the casing and just felt awful so I removed it and put in wide elastic. The wide elastic is much more comfortable. When the skirt isn’t on it does look bumpy within the casing but when stretched out around the waist feels nice and secure. For the hem I just did the most basic fold over and stitch method. It isn’t the neatest hem and I’m sill considering maybe at some point of doing a rolled hem on it. I have enough length that I can change the hem if needed.

Sewing this skirt was a lot of fun. The fabric only cost me like $9 so if I messed it up or didn’t like it there was no fear of wasting a heap of money. The fabric is nylon spandex which is not normally a fabric I would go near but I loved the colour and the texture so I tried it out. When I brought the fabric I didn’t know if I would keep what I made from it or not but now that I have made it I’m keeping it. It isn’t a summer skirt even though I am in an air conned office, it is a winter skirt. I have lots of summer skirts and now I have a good winter skirt.

Out of all the fabrics I brought on my fabric crawl I would not have guessed this would have been the first fabric I used but I love it. Oh and I have one question what do you do with your hands when you are taking photos. I am no model I don’t know how to pose 🙂

Cassiy


Overlocker To Work

Now that my overlocker is back from its time in hospital (Sewing Machine Warehouse) I was able to use it again. Ok so she came back 3 weeks ago I just hadn’t had time to sit down with her.

Serged Fabric Prep

Instead of easing her back into things I went full blast putting through a stack of fabrics I’ll be using in Christmas gifts this year. I rounded up all the fabric that I could think I would need and overlocked the cut edges. I did cheat and actually folded the fabric so I had 2 edges together. In theory I’m going to trim the fabric edges down anyway before I start my cutting so I know I’m working from straight (or my version of straight which sometimes can be a bit skewif) sides. I’m hoping by overlocking it together it doesn’t misshapen the fabric when I shrink it. I always buy extra fabric than I need so I’m sure it won’t end up in a disaster and I’ll still be able to make great gifts. Job done and a task off my July list done. Now as I get a chance I can soak my fabric and wash it ready to start on the gifts

Cassiy

Overlocking Your Edges Pre-Wash

So in the great debate to pre-wash fabric or not I fall on the pre-washing side of the fence. I also soak in hot water then wash on a normal cycle. One downfall to pre-washing is that your fabrics tend to become a bird’s nest in the machine as they tangle about and all the cut ends shred. Recently I heard about a simple tip to avoid this…. Overlock (serge) your edges before pre-washing! Of course what a simple idea.

Overlocking Pre-Wash

Last week I purchased some new fabric (for a project I’m making and yes I did need it as I didn’t have this fabric in my stash) I decided to try the overlocking idea out. The fabrics were denim and polar fleece. I ran the 2 cut ends of each piece through the overlocker which only took a couple of minutes to do. I then soaked the two together in the washing machine and later washed as normal.

Overlocking Post-Wash

The denim came out crinkled like it usually does but it wasn’t twisted in a heap like normal. I didn’t have to rip apart spiders webs just to stretch it out for the line. The fleece was fantastic. Previously if I washed anything with cut polar fleece I would find fleece fur balls all over it but this time there was nothing. Also my carpet would be covered in fur balls too but not this time.

So I can say after testing this idea out of overlocking the edges before pre-washing it is absolutely worth doing. It does take a couple of minutes to do but the end result is worth it. I also tried the idea out on a fat quarter and again it was great with no twists and tangles when I took it from the machine. This is going to be my way of doing things now. Also it is great incentive to clear the top of my overlocker cabinet now as I will be able to use that straight away instead of carrying my overlocker to my cutting table each time.

Peg Legs 1st Attempt

Peg Legs 1st Attempt

I have seen Peg Legs by Patterns For Pirates (P4P) everywhere online and decided to give them ago. Sadly my peg legs didn’t work.

Peg Legs 1st Attempt Stitching

Firstly I want to stress the reason they didn’t work has nothing to do with the pattern. The pattern and tutorial are really easy to follow, there is even a video you can watch just to see how easy they are to make. I had no trouble with actually making them it was the fit that didn’t work. I should’ve done my research and actually read the blog post on the P4P blog about making Peg Legs before I started them. I think I have used the wrong fabric. The fabric should be a 4 way stretch knit and mine wasn’t, I used a cotton jersey that was so soft but it just wasn’t right for this project. I couldn’t pull them up past my thighs and in the legs I just got my calves through them. Even though my legs are fairly toned there was no stretch in the tights. There is a possibility I may not have had the grain line the right way. I’ll be honest and say I didn’t check which way was the correct way for grain line with the jersey I used.

Peg Legs 1st Attempt Jam

I had a minor mishap when sewing them together that the thread got jammed on the prongs of the overlocker. I calmly disconnected the power from my machine, lifted the presser foot and wiggled the fabric off. I didn’t panic or stress. I lowered the foot again, connected the power and this time started from the other end until I got to that section and went over it. All easily fixed. My thread was also showing through the seam, thanks to some online advice it is suggested I tighten the tension in my left needle. Also apparently you should match your thread colour to your garment 😛 I must invest in more coloured thread.

Peg Legs 1st Attempt Pucker

On the positive side when I attached the waistband I only had one small pucker on each side, not too bad considering I can never sew curves properly. I am going to try these again. I will look for fabric that has a 4 way stretch. For my first attempt at sewing tights or any form of pants following the pattern wise I did pretty well am not stressed that they haven’t turned out properly. Peg Legs are a great first pattern to try as they are pretty straight forward. If you do wish to get the pattern I would suggest joining the Pattern For Pirates Facebook group first as members get a special discount code to use when purchasing the pattern.

Oh and I clipped the seams together instead of pinning them. Clipping was perfect as I could easily remove them before they went near the cutting blades.

Cassiy

Overlocker Rolled Hem

I love using my overlocker (serger) even though it at first scared me (sharp blade that eats away fabric, stitches very fast) Now I use it all the time when making clothing and WIRES pouches.  I have learnt you control the speed you stitch at by how hard you press your foot down and that the trimming away of fabric is a good thing. One thing I had never tried before on it was doing a rolled hem. I have a Janome MyLock 664D, when I brought it I had no idea of what features I needed in an overlocker as I had only previously used one once briefly. The 664D is meant to be easy to switch from doing a regular overlock stitch to a rolled hem so that is one of reasons I brought it (even though I didn’t know how many rolled hems I’d be doing)

I thought it was about time I gave the rolled hem feature a try. When I first read my manual on how to set it to rolled hem I got a little confused. I’m more of a visual person and find it easier to learn when I watch things (I am very thankful I’m learning to sew in the days of YouTube) I was going to wait until I went to a Sewing Guild meeting until I found this clip on YouTube which really gave me the confidence to try it at home.

The clip really shows you up close how to set the machine. It didn’t tell me however that when you take the needle out you will need to cut it away from your thread chain. I found this clip a couple of months ago and saved it in Pinterest for future reference. I watched it again as a refresher than headed to my machine. I had my tablet next time my machine and could stop the clip after each step and give it a try. One thing I did do was take a photo of my tension settings before I changed them to the rolled hem settings.

Serger Rolled Hem 1st Attempt

For some reason in my mind I was expecting it to look completely different. I must go back and read the many overlocker books I have as I had it in my mind it was going to have a large folded hem. Never mind, I am really impressed with the stitch that it did do. The hem on it is so tiny and neat. On some projects this would be perfect. I can see myself using this feature now that I know how to set it on the machine.

Cassiy


Colouring-In Book Tote

I’m really into Totes this Christmas and this was the first one that started me off.

Colouring Book Tote

I made this tote after doing a present count and discovering one child was getting less gifts than a younger sibling (a big thing when your 5) I thought a nice quick and simple but practical item to make would be a tote to hold a colouring book and crayon pack. This project took no time to make. The pink fabric was left over from another Christmas gift I was making. The dragon and princess fabric I found in my stash which ties in perfect as I found a princess colouring-in book in my spare room. It was a good project to use this fabric on as its not a print I would normally use. I did all the seams for this on the overlocker to cut out some of the work as the overlocker stitched it and finished the seams off in one hit. This project took no time at all to make.

I like the simplicity of this tote bag and I’m sure I will make it again in different fabric. I think I have a tote addiction but they are so practical how can you not love them.

Tiny Totes

After my jewellery boxes didn’t work out I needed a plan b to present the jewellery I’d made.

Tiny Tote Pink

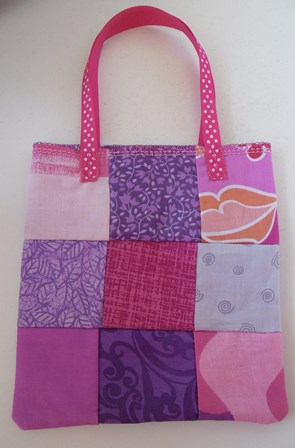
I went to my scrap fabric stash and looked at what I had on hand and came up with the idea of tiny tote bags. Each side of the tote is a 9 patch made of 2.5″ squares and a 7″ cross grain ribbon handle. The bags were all done on the serger. After deciding on the pattern I stitched up my rows then assembled the rows to form the block. I serged across the top of each block to finish the top edge of the bag. By chance I have purple and pink threads on my bottom serger loops so it looks a bit decorative. Once I had the 2 blocks assembled I serged them together to form the bag. The handles are simply hand stitched into place.

Tiny Totes

These took no time to assemble and look great. I can see the idea being used as a larger bag by either doing more squares or just larger squares. By doing them on the serger you don’t need to line the bag as all seams are finished. For larger bags I will do a stronger handle.

Smarter Sewing

Smarter Sewing

I’ve made another batch of WIRES pouches but this time I decided to re-look at the process I have of making them and do things a little smarter. So what did I do differently this time?

  • I started with cutting multiple layers at once when I was cutting them out. This cut the time down by half.
  • I used my overlocker (serger) to stitch the seams and finish the raw edges at the same time.
  • I left a long length of serger tail at the end of each seam to weave in to keep the seams secure. It took hardly any time at all in in front of the tv weaving the ends in
  • I used a triple stitch on the folded top hem that was more secure.

These little processes cut down the time it took to make the pouches and made it even easier to make up a bulk batch. I have learnt all these sewing skills so it was a matter of using the most appropriate sewing skill at the right time. It was worth stopping and taking a few minutes to work out smarter sewing processes.

Mikayla Skirt

I can now add child skirt making to my list of sewing skills.
Skirt 4
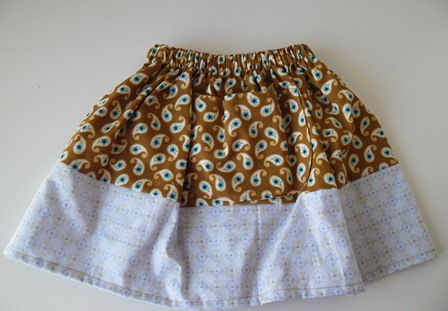
The Mikayla Skirt is by Seamingly Smitten. The reason for choosing this skirt (besides knowing a little girl by that name who may just be getting one for her birthday this year) is by looking at it the skirt, it doesn’t look complicated. Reading the pattern it is really simple to follow. The instructions are very clear. At the Sew-a-thon I made 4. The first time I followed each step by step referring back to the pattern. After the first skirt I only needed to refer back to the pattern when cutting the elastic length the rest was really easy to remember and almost instinctive.
Skirt 1
I must admit like anything that you do in bulk batches by the time I got to the last one I was a bit over skirt making. It had nothing to do with the pattern but more it was the end of the day and I felt like I was on repeat. 3 will be used as Christmas gifts, one is a birthday gift. I will make the pattern again, particularly as the one pattern can be made for 6months – 8 years. I urge anyone who wants a good little basic skirt pattern for their stash to try this one. You could embellish it with buttons or ric rac. You could do embroidery or put ribbon on it.
Skirt 2
I did have a bit of trouble overlocking the elastic on this as it was very bulky to go through the overlocker with the 2 pieces together. On the first skirt I had to do the seam a couple of times as I managed to cut a hole in the seam when forcing it through the over locker. After some advice from more experienced sewers (the friendly ladies at the sewing guild) I decided to overlock the edge of each piece separately before I joined the skirt the skirt with a seam. I wanted a strong seam so someone suggested a triple stitch so I tried that on a couple of the skirts.
Skirt 3