I am part of a few Facebook sewing and craft groups. I find them a great place to find inspiration but my bank balance may disagree as it tends to lead to online shopping at times. Recently in 2 separate groups I saw an idea for a skirt style which I instantly wanted to make at some point and in another group I saw a piece of fabric that I knew I had to have so I immediately went and purchased some. The two have come together to form my Lego skirt.

The fabric is from Rubyjam Fabric who I discovered after I made the purchase is a Sydney based company. The fabric print is officially called Building Brick Blocks and I got the boy colourway which is just a basic mix of colours, the fabric does come in a girl version which has more pinks and purple colours. As soon as I saw the fabric I thought I need Lego fabric!!!! Immediately I knew it would be a skirt, I am trying to get out of the habit of thinking every fabric will be a skirt but this fabric had to be a skirt. I ordered 1m… I think but when it arrived it looked larger than that so maybe I ordered more than 1m anyway it just gave me more to play with.

The pattern I used is a variation of the Cashmerette Turner dress. In the Cashmerette group someone had posted a photo of a skirt they made using the pattern. A lot of people do “pattern hacks” of the Cashmerette patterns turning the dress patterns into tops or the tops into dresses the Upton dress and Concord top are patterns that you see frequently done but I hadn’t seen anyone do a “Turner Skirt” before this and I thought it was brilliant idea. I asked the person further questions because I knew I wanted to make this skirt and I already had the pattern in my stash.

My original plans for my Lego skirt was to make like a basic tube skirt like the M664 pattern but my mind went into overdrive when I discovered my fabric was long enough to make this skirt. For the skirt portion of the Turner the back and front of the skirt is the same pattern. Normally in cases like this I would just trace and cut the pattern once onto trace and toile. When I traced out the pattern and held it against the fabric that was folded to see if I would have enough fabric to make the skirt I realised it was going to be very close to not fitting so it was better to trace out 2 patterns and pin them at once. Instead of pulling out my paper pattern piece again I placed the piece I had cut out on my craft table and traced over that. I did it in a different pen colour so I could easily see that I had traced it all.

In the end it was very close with less than 2″ of fabric left over. I really pinned the two pieces as close as I could to fit and had I only used one pattern piece to cut out the 2 sides I know I would have been short for the second piece.

As a result of my lack of remaining fabric I had to be creative with my waistband. As the pattern is designed to be made as dress I had to make my own waistband pieces. In previous waistband pieces I have made I have cut my rectangle pieces across the grainline but in this case there wasn’t enough so I cut my rectangles from scraps running down the length of the grainline. To work out how long to cut the rectangles I measured around the top of the skirt pattern which was 12″ on fold so 24″ in total. As I was having to cut 2 pieces for the waistband and join them my initial thought was then to add in seam allowance forgetting that the pattern piece I had measured had already included the seam allowance. From previous experiences elastic waistband pieces have always been a little smaller than the item you were attaching them too so instead I cut my 2 rectangles 23″ x 3.5″ so I could use 1″ elastic inside it. I placed my waistband so the joins would be in the centre front and back. I was just easier for me to do this and no one gets that close to my waist anyway to see. For the gap I left to thread the elastic through I used a method I read on the Fringe Association blog. It worked out really well, I just hand tacked the sides flat on both my join pieces and then removed the thread once my elastic was in. On the portion that was inside my skirt I did use some of the selvage fabric on the waistband. It was on the inside, it didn’t matter and most of it got cut off on the overlocker.

I’m happy with the finished waistband. I assembled the skirt on the overlocker. The fabric was a little heavy so to reinforce it even though I used a 4 thread overlocker I went and did a row of stitch on my sewing machine over ever seam using a stretch stitch. All my seams were pulling a little bit, I read afterwards elsewhere someone else had the same problem and it was suggested they tighten the left needle in their overlocker.


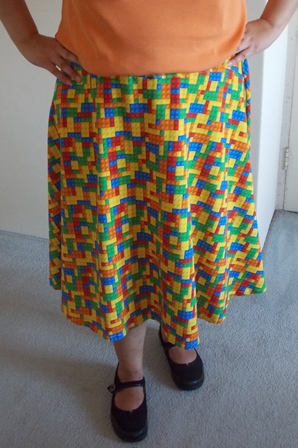
Looking at my pattern I believe I cut out the size 24 but I think I could have gotten away with the size 22 or at least graded in however I am super happy with this skirt. It is a little bit longer than most of my skirts but I really like that. The fabric is a cotton knit which you could wear in either summer or winter.


You can twirl in it however I think I might be too old to twirl without the aid of some alcoholic refreshments because when I tried I became really dizzy luckily I had the wall to hang on too. Next time maybe I need a bigger space as there isn’t much room in my bedroom.
- Comfort √
- Classic √
- Creative / Quirky √
- Natural Fibres √
This skirt ticks all things on my list of things to consider when making clothes. With the elastic waist and cotton knit it is comfortable and I won’t get hot in it. The style is like classic circle skirt and it certainly is quirky. I work in a paediatric environment and I have had so many comments about my skirt at work. It is bright and cheery and fun. This is my most fun item I have ever made in terms of clothing.
I love the idea of “Turner skirts” and I will be making more. I am going to do a plain black one which I have actually brought fabric for since making this. It is a really nice style skirt. I will make a proper Turner dress at some point but I can see another skirt arriving first.
I am a big kid I love my skirt.
Cassiy

