Sparkle Cape

Everyone needs a little sparkle in their life right?

Frocktails last year was in late spring so there was a chance it was going to be warm, particularly in a room full of people. I was going to have to travel to and from the venue by public transport so I needed something for over my shoulders, I didn’t want anything too heavy or cumbersome but at the same time I wanted adequate coverage. I am paranoid about getting a chill in my shoulders and back, I don’t know why I just am. I don’t like air conditioning so even if it is really hot outside I need to have something to put over my shoulders if I go inside. I’m the strange person you see carrying a jacket in a heatwave.

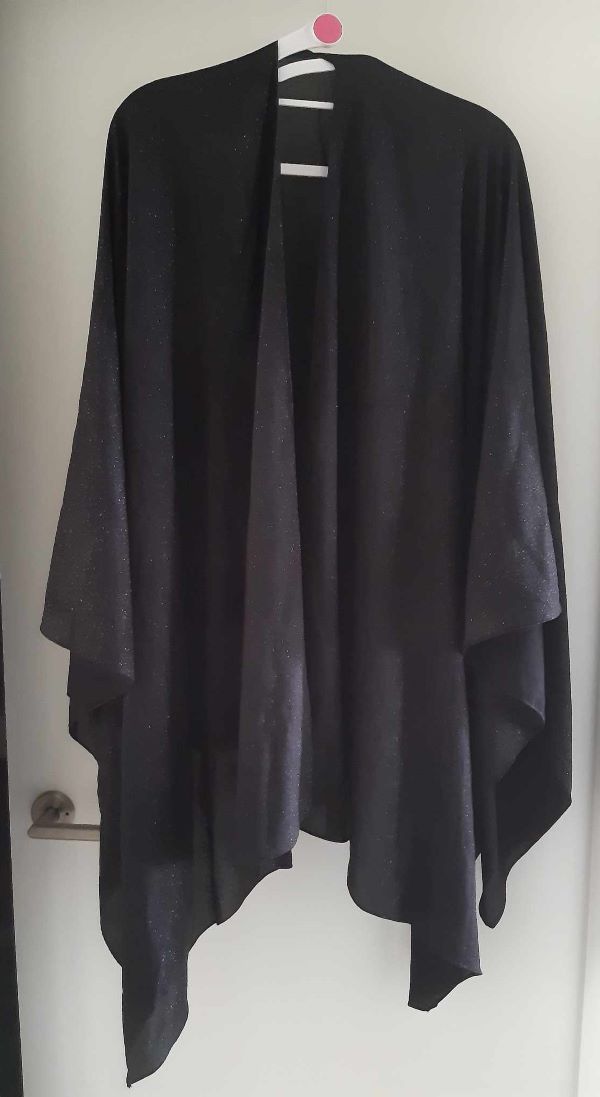
In October The Remnant Warehouse had a sale. In the days before sale started I was “researching” their website just to see what fabrics they had. In the last couple of years I’ve hardly brought any fabric as I have been trying to sew my existing stash first. I saw they had a black cotton voile crepe fabric which had glitter sparkles on it. I instantly wanted this fabric, I needed glitter sparkles in my life. Even though I have been sewing for over 10 years I don’t have a lot of experience with different fabrics. I know what some fabrics feel like such as quilting cottons, corduroy, lycra knits, rayon and denim, but apart from that I have no concept just from the fabric name of what fabrics feel like. I knew what cotton voile felt like and I had an idea of what crepe felt like but I didn’t know what a combination of the two would be like. I have sensory issues to some fabrics but as it was cotton voile I thought I could have it against my skin. I ordered 2m of it during the sale and hoped for the best. When the fabric arrived it looked even better than in the picture. The sparkles were fantastic creating just a little bit of interest to the black background. The best way to describe the fabric is it has more texture to it than a regular cotton voile, like a crisp feel. The fabric drapes nicely but still holds it shape.

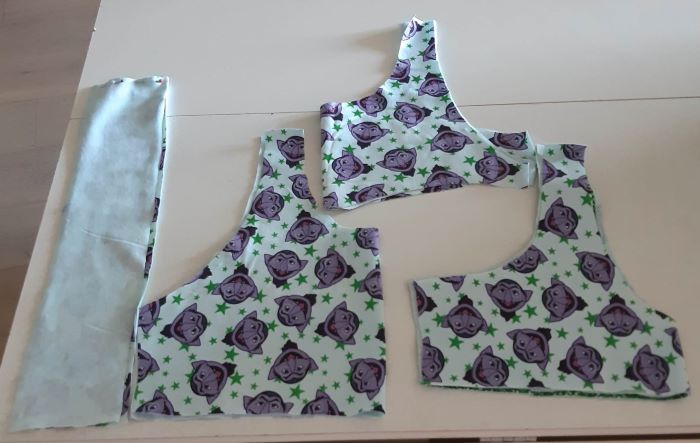
Burda 7313 view D is the simplest cape you will ever make. It is a one piece pattern with no seams. One end of the fabric is cut up the centre to create the front sections and neckline. The only sewing is the hem around all the edges. Your fabric is the star in this cape. I had made it twice before, the first was a previous Frocktails cape, the other as a Barber’s cape for our home haircuts. If you make it in a lightweight fabric you can scrunch up and put it in your handbag if you don’t need to wear it.

You do need to hem this cape across the back, the front and around the neckline. I did a rolled hem on the sewing machine. I haven’t done a lot of rolled hems in my time as the few times I had tried them I failed. This time I was determined to learn how to do it. I’m very happy with the result, I will do a blog post about them at some point.

For this cape it was the perfect fabric. Even though it was a lightweight fabric it was still dense enough to provide coverage over my shoulders without it feeling too hot. The sparkles lifted the fabric from plain black voile to something special.

The cape is an item that I won’t get a lot of wear out of, I don’t go to a lot of events let alone ones which need sparkles. I’m still going to keep it in my wardrobe. If I make it to Frocktails next year I might wear it again as it is useful, I don’t mind repeating an item of clothing at the different events.

Cassiy

Banksia Bralette – Attempt 1

I think I purchased Banksia Bralette by Muna and Broad in 2021 after I had tried the making the Calista and 25K bralettes. The Banksia is a very simple wireless bra pattern. It can be made of any 4 way stretch fabric that has a good recovery. What sets the Banksia apart from other patterns is that it includes the option of strategically placed slings which separate the breasts so you don’t get that uni boob feeling when wearing it. From the outside it looks like a regular crop top / sports bra but on the inside the magic happens. If you follow the pattern link you can see the sling magic.

My brain thinks a little differently to most. When I first found out I had the adenoma and it was highly likely I would need surgery one of my first thoughts was I’m going to need to make comfortable underwear to wear in hospital. At that stage I hadn’t read up about adenomas so I didn’t know how long my hospital stay would be following the surgery I just knew I needed to sew for it. I was thinking I would need for 4 or 5 bras for hospital. I printed out the Banksia pattern and ordered the notions and fabrics needed for so many. I had no idea if I would like that bra once I made it, I just figured I would learn to.

For my first attempt I didn’t use any of the fabrics I purchased in my panic of “I need bras” Instead I used a piece of cotton lycra sesame street printed fabric from my stash. The fabric was only 50cm long but had good recovery, I didn’t know what else I would use it for so I figured why not use it in this test garment. For the bra slings I decided to use the same fabric that I was using for the rest of the bra instead of using powermesh or powernet.

In December when I made this I wasn’t in the clearest of headspaces and I didn’t read the pattern properly. I didn’t realise that for the pattern you needed an outer fabric, lining fabric and the sling fabric. I didn’t have enough of the sesame street fabric so I grabbed an offcut of cotton lycra from my stash which I used that for the outer pieces leaving the sesame street fabric for the inner fabric and slings.

Construction wise this is a very easy garment to sew. Whenever I sew on waistbands which have an open gap for elastic I have to watch that I don’t sew the band on the wrong side of the garment so that the open gap is on the inside. Well now I need to add bra bands to that list too as I stitched it on the outisde not the inside of the bra. I did it on the regular sewing machine not serger so it was difficult having to unpick that lightening bolt stretch stitch. Given that it was only a test garment to try out the fit I could have left it but I didn’t.

Around the neckline and armholes fold over elastic is used. In the past I had used it without much success. This time following the advice from the Youtube video showing how to make the pattern I had better luck. I opted to use a contrasting thread colour so I could see the stitches against the black.

I made size D with the narrow shoulder D cup option. Before I added the fold over elastic I was skeptical that it would fit. The elastic pulls it all in a little. For a first attempt it was wearable. It is comfortable to wear. The slings do stop that uni boob but you do need to manipulate the breasts and the slings to get them in. In a normal RTW bra I have to adjust myself when I put it on so it is no different in this bra.

I later found out I was only going to spend one night in hospital so I didn’t need to make anymore bras at the time. I will make this again in the future. Next time for the slings I will use powermesh to give more support. I think I might need to raise up the shoulders a little just like I thought for the 25K bra. There is a little gaping around the neck which I think is a result of me being hollow chested. The pattern has instructions on how to adjust it for hollow chests so I will try that adjustment.

I find wearing me made items calming. I wore this on the day of my surgery with my matching undies in the same green fabric. For the surgery itself I only wore a hospital gown and undies but I still had that comfort of me made items.

Cassiy

Sewing Fears

Daily writing prompt
What fears have you overcome and how?

Today writing prompt immediately made me think of sewing fears. Some people have fears in sewing. A fear of zippers, a fear of using an overlocker (serger) a fear of using the “Good” fabric. Sewing can be very relaxing but at the same time very terrifying.

Over the years I think I have had a few sewing fears. When I first got my overlocker I certainly was fearful or intimidated by it. That machine has blades and if your fingers slip than you’re in trouble. It cuts your fabric so there is no going back if you make a mistake on it. Once I started using it I realised it isn’t that scary. You learn that you can control the speed therefore you have control of your work. There are ways to hold the fabric so that your fingers are not in harms way. I love using my overlocker now.

I’ve mentioned before I have never sewn an invisible zipper. I’m not fearful of them I’ve just never had the need to install one in a make. Zippers can be intimidating to work but again they are one of those things the more you use them the better you get at sewing with them. I actually like using zippers. On some projects they can be a bit tricky so I might need to do extra steps like had baste them into place before taking it the sewing machine but it is worth it and takes away some of the fear of zipper sewing and getting it wrong. If you do get it wrong you can always unpick it and start again.

I don’t think I have a fear of fabric. I do have a lot of “Good” fabric that I haven’t used yet. The Liberty fabric in the picture above is a prime example. If you are not familiar with the fabric world Liberty fabrics are expensive and kind of a luxury. Liberty fabrics can live in a sewer’s stash for years before they finally sew it. For years this fabric has been in my stash waiting for the perfect project to use it in. Recently I decided I would just use it and started thinking it may be pants, not sure if it will be pj’s or maybe even a pair of Robbie’s. This fabric is on my shelf to be used soon.

I guess with sewing or crafting in general any fears you have can be overcome just by trying out a project with said fear. Try an easy pattern, play with some scrap fabric on the overlocker, just cut into the “Good” fabric. If items are in your stash/collection/possession than just use them. Don’t be fearful or intimidated just relax, have fun and give it a try.

Cassiy

Dumpling Pouch

Dumpling pouches are a style of zipper pouch that I have seen over the years but I had never had the urge to make. I was in the mindset of I have a style of zipper pouch that I know how to make and adapt so why do I need to make another style? Over Easter I decided why not give them a try.

There are a lot of dumpling pouches free and for purchase if you do a Google search. I chose the free Persimmon Dumpling Pouch by Sew Sweetness patterns. I was familar with Sew Sweetness patterns as Sara designed the McCalls train case pattern which I had made numerous times before. Sara is also the person on Youtube I follow when making zipper pockets on bags. On her website she has loads of useful tutorials which mostly are related to bag making but there are some which are just sewing related in general such as how to clean your iron. The website is well worth checking out if you have the time.

The reason I chose this pattern ahead of the others was for 3 reasons

  • It was a free pattern
  • It came in 3 sizes
  • There is a Youtube tutorial to make it

Having no interest in sewing dumpling pouches prior to this one I had no idea how they were constructed. I am a visual learner so having a youtube clip allowed me to watch the process and understand in full easier than just a step by step pattern. The written tutorial that comes with the pattern download is pretty comprehensive, it is well written with step by step photo instructions, however, I found the pattern easier to understand after watching the video. After making this first one I don’t think I will need to refer back to the video again in future.

Construction wise this is a very easy pouch pattern to sew. The tutorial has you piece the outside fabrics of the bag and have plain fabric on the inside. The pattern pieces are the same for both the inside and outside so it super easy to just cut four of them for any fabrics you want for all your pieces. I used odd shaped offcuts leftover from previous projects for my fabrics. This was a spur of the moment project so I went to my fabric stash with my pattern piece and found 2 leftover fabrics that were just sitting there. The outside fabric came from a top in 2018 and the inside fabric was from a more recent make. The zipper came from my zipper stash, I searched my stash for one long enough. I made the small size.

For a new pattern I wasn’t familiar with I actually found this a really easy sew. Literally from tracing out my pattern piece onto trace and toile to hand sewing the turning gap closed only took me a few hours maximum (I think it was closer to 2 hours) That included unpicking one of the lining pieces after I accidentally caught the zipper teeth in it. The only section I found tricky was sewing the box corners on the end where the zipper was open. You had to try and hold the zipper ends together without twisting them. It wasn’t that hard. The tutorial also tells you to open up the zipper when sewing on the 2nd half of the pouch to make sewing it easier, I didn’t and had no issues.

Did I need to make a dumpling pouch? No.
Did I become obsessed with the pattern after coming across it? Yes.
Did I have fun making it? Absolutely!

Normally I sew for a purpose. This time I wasn’t sewing for a gift or for a need I was just sewing because I could. There was no pressure, I didn’t have a deadline. I was sewing because I wanted too, because I was in the mood. I really enjoyed making this project, even when I caught the zipper teeth I didn’t get stressed out or angry.

I had no idea what I would use this pouch for so it sat idle on my craft table for a week. I brought some plastic links that are mostly used to hang onto baby toys but you can use to hang items in bird cages. I hadn’t even thought of where I was going to store the spares once I took them out of the packet but the pouch was the perfect size.

Dumpling pouches look very cute, I couldn’t believe how cute it looked finished. For a zipper pouch they open up pretty wide. That makes access to contents easier but the drawback as it is so open without side structure the contents can fall out of them easily if they are fully opened. Having a double zipper on them might be a better option on them as it would allow you to open up the pouch on both ends to the point you can still access inside the pouch easily but things won’t fall out. I can see why a lot of people make these as cosmetic pouches. I initially had decided not to make Christmas gifts for my nieces this year but after the speed and ease of making this pouch I’ve changed my mind. I have all the supplies I need on hand I think I can mange 4 of these.

Cassiy

Cutlery Pouch

I have mentioned on here before about my food related OCD issues. One of them is that I don’t like touching my food with my hands when I’m out, if I can avoid it I do. Sometimes you can get utensils sometimes you can’t. At work in my desk drawer I had packets of plastic utensils but I decided to get a set of reusable ones and need something to hold them in.

If I want a zipper pouch my first pattern of choice is the Essential Wristlet by Dog Under My Desk. I have only ever made the pattern twice as a wristlet all the other times I’ve used the pattern for pouch or bag. The size I made this time is the regular box corner version. I set myself a challenge of choosing fabric from a plastic storage tub full of random small pieces. The fabric sizes aren’t big enough to make a full project with but too big to be classed as a scraps. In terms of the fabric print I won’t say I was looking for ugly fabrics but more fabrics I was unlikely to use in other projects for myself. The size of the fabric was more important as I was looking for pieces around the size of my pattern piece to avoid fabric waste. I’m not a big fan of stripes or animal prints but I’ll happily use them on a pouch like this.

I used a cotton dress zipper I found in my zipper stash, again it was a zipper I was unlikely to use in another project. I didn’t use any interfacing in this pouch as I wanted it to collapse down. I have a lot of items in my desk drawer so I didn’t want it to take up more room than necessary. I’m really happy how it turned out.

After using the cutlery I brought I discovered I didn’t like the shape of them. The spoons were an odd shape, they felt more like a scoop in my mouth not a spoon. They were really awkward to use. The forks felt too fat too. Unfortunately we didn’t have any spare cutlery at home so I purchased a metal set and replaced the plastic ones. There was no point holding onto a set that I wasn’t comfortable using. The new metal ones are a slightly different weight to our regular ones at home so we can distinguish between home or work ones. Buying the plastic set wasn’t a total waste, they are quite sturdy so Womble can use them out on the balcony when gardening as small tools are easier when working in pot plants.

I mostly take sandwiches to work but when I do need to use cutlery I’m happy that I have my own now. 

Cassiy

Pool Dress

Some projects jump the blogging queue and this is one of them. I’m so happy with how it turned out I just couldn’t wait to share it.

A little background to this dress. At the end of last year (summer time in Australia) I finally started using the pool in our apartment complex after it had been opened for over a year. To get to the pool and back I need to walk through a few common areas including those which have air conditioning. I didn’t like to wear just my swimming costume in transit so I would wear a t-shirt and wrap a towel around my waist. On more than one occasion the towel fell off as I walked, I struggled to hold on to it as I walked. I needed to come up with a better solution.

I decided a dress would be the easiest option as it gave me coverage over my torso area plus it was only one item of clothing I needed to make. I have many dress patterns in my stash but I’m a creature of habit and instead of trying something new and having to fit it I went with a top pattern which I had made 3 times before and lengthened it to a dress. Even though it is March and now autumn in Sydney we are having a period of hot weather, I wanted to get this dress made so I could wear it whilst the weather was still warm. The pattern I chose was the Cashmerette Cedar Dolman top. This is my TNT (Tried and Tested) top pattern and now dress pattern it seems.

This wasn’t the first time I had lengthened a top pattern to a dress. I’d previously made a dress using the tutorial from Wendy Ward’s a Beginner’s Guide To Sewing With Knitted Fabrics. In essence all you are doing is adding length to the bottom of both the front and back pieces. If the top doesn’t fit over your hips you may need to grade out the angle to fit your hips. I measured Peak dress to get an idea of how long to make my pieces. I decided on finished length of 43″ from top of shoulder to hem which in hindsight was a little long so next time I think I could do only 40″. The length doesn’t restrict my movement and I can still negotiate stairs in it.

The fabric I used was a terry toweling knit which has been in my stash for over 10 years. From memory I picked it up at a charity shop and have only used a small portion of it in a previous project nearly 10 years ago which is how come I know how long I’ve had it. I knew it would shed fibres when I cut it so I used pinking sheers instead of regular scissors to cut it out. This saved my floors immensely from looking like a fight with Big Bird.

I make my Cedar’s a little different to pattern instructions. The design has a centre front seam which I eliminate. I cut my front piece on the fold just like the back piece. Due to the seam allowance the front piece is 1″ wider than the back. I can’t remember what I did on my 3 previous ones, I think I placed the front pattern piece 1″ over the fold line of my fabric to remove the extra fabric. This time I moved my back piece 1″ back from the fold of the fabric so that I it would have the same amount of fabric. To make this top as low fabric waste as possible I pinned my front piece to the fabric, measured down 21.5″ from the bottom of it and drew a rectangle to make the front of the dress. From the bottom of the rectangle, I then drew up another 21.5″ and placed the bottom of my back piece and pinned it. My fabric wasn’t directional and didn’t have a nape so I could flip the direction of the pattern pieces. I’ve done this technique many times before on bag pieces but not on clothing and it seemed to work well, there was very minimal fabric waste.

Whenever I make an item with shoulder seams I reinforce the tops of the seams. Normally I use stay tape which I fuse on to the back pattern piece. This stops the shoulder seam from stretching out. For this dress I decided to use some of the same fabric to reinforce the seam. I didn’t know how well the stay tape would fuse to the towelling fabric and I had scrap fabric leftover so why not use it instead. After I cut out my pieces I measured along the top of the shoulder and cut two pieces to fit which were 1.5″ wide. On each strip I overlocked (serged) the short ends and one of the long ends. I then placed them on each shoulder of the back piece and stitched my shoulder seams as normal. They are rolling a little as this is a knit fabric. I’d forgotten I have used this technique before but with a narrower piece as the shoulder and in a fabric that didn’t shed. If I do this again with a wider strip like in this dress I would top stitch down the pieces before I did my side seams. On this garment I’m not bothered by the rolling in. I constructed this dress all on the overlocker and only used the sewing machine for the binding.

I make 2 other small modifications when making my Cedar’s:

  • I add between 1″-1.5″ to the end of the sleeves as I don’t hem them the traditional way
  • I don’t put a facing on the neckline instead I use bias binding or a band

On this dress I used binding on both the neckline and sleeves. I had some leftover soft cotton twill bias binding I’d made previously so used that. Normally I sew the binding to front and flip it back to the inside of the garment and stitch it down so you don’t see it but I decided to have some fun and make the binding a contrast feature so this time I did the opposite sewing it down on the front. The bottom of the dress is a double fold hem. My hot ruler came in handy for this and it took no time to do.

I did have the thought I hope I’m more banana than Big Bird which is something I never thought I would ponder. I actually really like this dress hence why it jumped the blogging queue. It is functional, it used a fabric and binding which I had on hand so it is sustainable and decluttering at the same time. I was a little worried about the colour (I’m not a bright yellow person) but I think this dress actually looks cute.

Cassiy

Calista V 25K Bralettes

Confession at the end of 2022 I made another Bralette but I thought before I blog about it I should post about a couple I made in 2021 that I never got around to sharing yet.

Back when I was doing “To Sew” lists which were lists of clothing patterns I wanted to try the Calista Curvy Bra by Stitch Upon A Time was on my list. It is a sports bra which came in 2 versions for the front and 4 options for the back. The 25K bralette by Rad Patterns I came across in a Facebook group. It is a plain sports bra that comes in multiple cup option. The pattern is free for those who join the Rad Patterns Facebook group otherwise the pattern is only $5 (US) so not too much and I have to say is worth the money. I decided to make both bras at the same time.

At the time my measurements were
Full Bust – 46″
Under Bust – 38″

For both bras I ended up picking size XL for the front/back and size L bottom band. Both patterns had options for the cup size so I chose the larger option for both. For the Calista I kept it simple so went plain front and back. On both I used cotton lycra for both the inside and outside. On the front I used a print and the back was black.

Unfortunately the Calista didn’t work for me. Across the back it fitted but at the front there just wasn’t enough fabric to give me coverage. I couldn’t even get away with just wearing it around the house. I found the shoulder straps to be very narrow too. You sew it via the burrito method and it was very hard to pull the right way out with the narrow straps.

The 25K was a lot better. It was a similar shape to the Calista but I had full coverage at the front. The only drawback as such is that there is a little bit of uni boob going on but that isn’t too much of an issue. It is so comfortable. It is designed for low support. In 2022 I pretty much lived out of it on weekends if I had to dash to the local supermarket (about 60min round walk) It gave me a break from having to wear wires (which I do Monday – Friday) To make it more supportive instead of using cotton lycra you could use athletic or swim knits or line it with power mesh.

With the leftover fabric I made a pair of Scrundies. It was the first time since I was about 11 that I had a matching underwear set. At the start of 2022 I had to have biopsies done (they came out negative) I wore my set to the appointment. In my mind I just needed that little bit of me made clothing and comfort to get me through it. The biopsies were done under local and I didn’t have any pain after it but it was very reassuring to know I was going to put back on a comfy bra afterwards.

I offered the Calista to a friend’s daughter but it was too big for her so in the end I unpicked it. I haven’t done anything yet with the fabric. The pieces are an awkward size, too small for me to cut into undies for me. It is in my knit scrap box and I’ll figure out something with it.

After making the two I had been meaning to make another 25K but never got around to it. If I was to make another I would take up the shoulders a little. You have the option of putting non roll elastic in the bottom band which I might also try. I’m unlikely to make another Calista, I think I would need to do a full bust adjustment which is a lot of work when I know the 25K fits. As mentioned at the start I recently made another bra which, like the 25K does need some adjustments but it does fit, so I won’t be making another Calista.

Cassiy

Make Do And Mend – Denim Tote Bag

Back in 2015 I made a denim tote bag. It was to replace a tote bag which I had for nearly 10 years. At the time I said I hoped it would last me 10 years.

Unfortunately late last year the bag got a hole in it. Womble didn’t realise it had fallen from his grasp and it dragged on the ground besides his wheelchair for a period of time. The hole wasn’t huge but it was large enough and in an awkward position that you had to be careful what you carried in it. As the bag gets used a lot by Womble these days I decided to repair it. There was one jagged tear and a couple of places where the fabric was grazed. The easiest way to repair it was to put a patch over the entire area so the grazed areas wouldn’t later turn into holes.

For the patch I used an offcut of denim leftover from when I made the aprons. The denim is slightly thicker than the stretch denim which I used to make the bag but it isn’t too bulky, it isn’t like a jeans denim. I measured the area around the hole and cut my patch an extra 1″ wider and taller. Using my hot ruler I ironed over a 1/2″ seam all around the patch. I wanted a generous seam allowance so that I could stitch it on securely. I hand stitched it into place. Given the location the patch was it in it was easier to sew it by hand instead trying to manipulate it around on the sewing bed.

I’m really pleased at how it turned out. I like the little bit of contrast the patch adds. It is also a great little visual reminder that I’m making sustainable choices and prolonging the life of items where I can.

Cassiy

2022 Toiletry Bags

I’m a creature of habit. If I like a pattern I will make it over and over again as is the case with my toiletry bag pattern. I made 5 in total for this year. By chance today is Valentine’s Day and all of the bags have hearts on them.

The pattern I use is the Boxed Corner version of the Essential Wristlet by Dog Under My Desk patterns. I enlarged the pattern to 150% when I originally printed it. This size holds a lot making it the perfect size for a toiletry bag. Last year I made 2 for my nieces as I have started a tradition that they get one for their 12th birthday. It is the year they start high school so they will be going to more sleepovers and camps. I used the same fabric for both and used a different colour zipper on each one. The outside is a quilting cotton which I used to make a previous gift for their older sister. I still have some of the fabric left which I’m hoping to use in a gift for their younger sister so that all the girls have something made from it. The inside of the bag is nylon.

The other 3 I made are for this year’s charity bags. I put all the containers of liquids (shampoo, conditioner etc) in them when I donate the bags. Toiletry bags are a practical item for the charity bags and very simple to make. The inside fabric is once again nylon and the outer another quilting cotton from my stash. Originally I had the quilting cotton cut to make WIRES pouches but my stitching on them wasn’t too good so I salvaged the fabric and cut out the toiletry bags instead.

I was planning on using orange zippers as I had plenty in my stash. So that the zippers matched in with the rest of the toiletry bags and didn’t look odd I appliqued a heart on one side of the bag and did lines of my favourite machine quilting stitch design on the other side in orange thread. It is a row of hearts which flip as they go along. I made the outsides of the bags and then discovered I only had 2 orange zippers left in my stash…. opps! I found a purple zipper and used that as the 3rd zipper. Lesson learnt for next time check that you have all the supplies in the colours you want before starting a project.

This won’t be the last time you see this pattern on here as I plan on making more again this year. Before planning out fabrics I will check to see what zippers I have beforehand. 

Cassiy

Green PJ Top

2017 was the last time I made pj tops and they are still going strong. They are a little stretched out now and fit more light nighties instead of tops but they are still wearable. You can see my previous versions here and here. At the start of last year after finding a green cotton knit in my stash I thought I would make another top.

I used the Kwik Sew K4088 pattern which is the same one I used last time. It is a men’s pattern but I like it because it is a roomy top. Once again I made size XXL.

The fabric was a heavier cotton knit than I used last time. Like when I made my previous ones I didn’t finish off the hems. Call it conserving resources (thread, power, time) call it laziness. Knit fabric doesn’t fray so there wasn’t any real need to finish the hems. It does mean they roll a little but it’s a PJ top so it doesn’t matter I don’t think. The side seams on my previous tops haven’t come undone as I stitched them on the overlocker so these seams will also be fine.

At first I thought the fit was good. Upon wearing it a few times my mind changed a little. I know in recent years my rounded shoulders have become worse. Wearing this top it became apparent. At times I feel like it is choking me a little. It isn’t totally uncomfortable but I just notice it a little. As my other shirts are so stretched out I don’t notice it but as this top is new and maybe a little more stable knit I can feel the difference.

Cassiy